Adobe’s Digital Negative (DNG) file format
With the advent of digital photography a number of years ago, Adobe developed and created an open source publicly available specification called the Digital Negative or DNG for short. Adobe released the DNG format in 2004.
As camera manufacturers developed new cameras they often developed a new camera RAW file format presumably to bring the most of the camera body out. The reality is all camera manufacturers store the same information they simply choose to store it in a different format or order within their respective RAW file.
To give you a sense of just how many RAW file formats are out there just take a look at the below link. Canon has CR2, Nikon has NEF, Olympus has ORF, and the list goes on. There are however a handful of manufacturers who actually store their images as DNG files.
https://helpx.adobe.com/photoshop/kb/camera-raw-plug-supported-cameras.html
With such an exhaustive list of various camera RAW formats it’s easy to understand how much work Adobe has to continue to maintain it’s Camera Raw database in order to read the various file formats in their products, namely Lightroom (LR).
Today’s digital cameras store abundance of information in the RAW file. Such metadata such as camera body, serial #, shutter speed, aperture, ISO, white balance, flash firing (or not), lens used, etc. Then after you as a photographer have downloaded your images you may add additional information such as your copyright, name, URL address.
Then comes along your image processing tool. I use Adobe Lightroom (LR). This allows me to catalog, keyword and develop these images. LR stores this information internally and further stores it internally in the DNG file or in an XMP sidecar file with your original RAW file.
Let me say that again for clarity. LR will create an XMP sidecar file alongside your original RAW file (CR2, NEF, ORF, etc) for your metadata and develop adjustments. If you are using a DNG file this information is stored inside the DNG file itself. So if you want to send a customer a processed RAW image you must remember to also send along the XMP sidecar file as well (although in most cases you’ll be sending a JPG file).
In the below first two highlighted lines represent a Canon CR2 RAW file along with its associated XMP sidecar file. The next file is a DNG file containing exactly the same attributes (metadata, keywords, develop settings etc.) all contained in one file. You’ll also notice the DNG file is smaller.

So what are the advantages and disadvantages of DNG?
Advantages:
- DNG is a universally accepted RAW file format that is publicly available. DNG can be read by all of the major image processing tools (LR, Photoshop, Capture One, Affinity Photo, etc.). This allows for security knowing your image files are protected in the long term. What happens if Canon decides to no longer support the CR2 RAW file that was used in the Canon 30D? (Although there are no documented occurrences of this happening).
- There is no concern in buying new camera gear that supports DNG. Any DNG supported camera gives you the comfort of knowing you can immediately process them in your tool of choice. Many times the Camera Raw support provided by software companies lags behind the availability of the camera release.
- File sizes are generally smaller.
- Additional Metadata is stored in the DNG file itself instead of in an XMP sidecar file. You only have 1 file to transfer or backup instead of two (the image file and the XMP sidecar file).
- Using industrial strength image processing tools such as LR are available. Relying on camera manufacturer software to process your images is downright wrong. Why do we allow these manufacturers to hold us hostage to their proprietary RAW image formats? We should be able to use a standard DNG format should we choose.
Disadvantages:
- You’ll need additional processing time to convert your RAW files to DNG during LR import.
- Additional disk space required should you decide to convert to DNG and keep your original RAW file for archival purposes.
- Backups! Here is a big one for me. I have an iMac with my LR database and images. When I make edits to images that are stored as RAW the only data that is changed is the XMP sidecar file itself. This significantly reduces the amount of data that is transferred between my local QNAP server and my remote server.
Ready to convert?
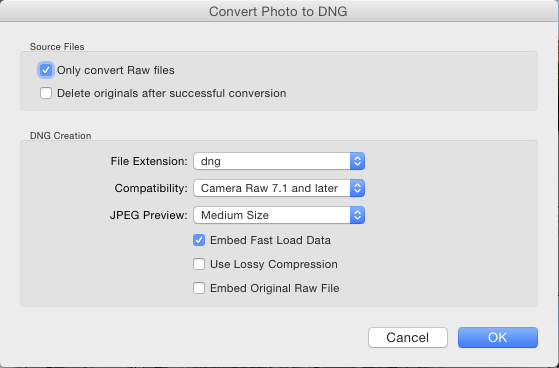
If you want to convert your images to DNG there are a couple of easy tools to use. One is to use Adobe LR. While in the Library module click on the top “Library” menu item and scroll down to “Convert to DNG…”. I DO NOT “Delete originals after successful conversion” but rather archive them away in a new location. I also do not “Embed Original Raw File” as it then defeats the purpose of generating a smaller DNG file.

The other option is to use Adobe’s RAW Converter for Mac or Windows. As LR has the ability built in there is no need to download a separate application.
Adobe DNG Converter for Mac or Adobe DNG Converter for Windows
Understanding RAW
Now you might be asking yourself “I don’t understand all this because I shoot all my photos in JPEG”. Read our Understanding RAW article for more details.
Summary
So, what do I do? Right now I have a majority of my photos in their original RAW format. When a new version of LR is released I backup my Library and ensure the XMP sidecar files are current. After I upgrade my LR version I immediately check to ensure that I have backwards compatibility to my old RAW files. If in the highly unlikely event that I don’t have backwards compatibility I would immediately restore my previous version of LR & catalog and decide what my next steps would be.
By remaining with the original RAW file I don’t have the additional overhead of converting to DNG and my backups are significantly faster.
~RoTP team