Panning Photography from a Wikipedia Point of View:
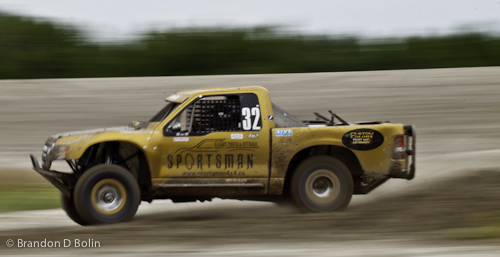
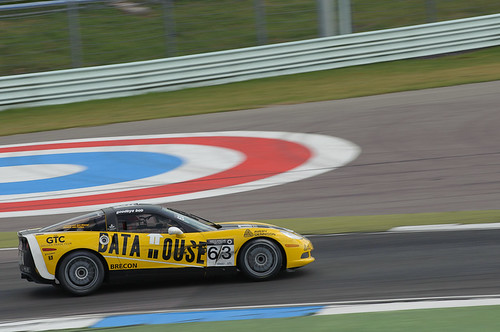
Wikipedia – In photography, panning refers to the horizontal movement or rotation of a still or video camera, or the scanning of a subject horizontally on video or a display device. In still photography, the panning technique is used to suggest fast motion, and bring out foreground from background. In photographic pictures it is usually noted by a foreground subject in action appearing still (i.e. a runner frozen in mid-stride) while the background is streaked and/or skewed in the apparently opposite direction of the subject’s travel.
When Is Panning Used?
Panning is most often found in car racing events, however panning may be used in anything from boat races, to bikers! As long as the main subject is in motion, either that be horizontally or vertically – you can make a panning shot. Now for the record, I have never seen a vertical panning shot…
Panning photographs portray motion, and helps isolate an object because of the blurred background. It often helps to use panning images when there is a very noisy and crowded background because it can all be blurred out.

Basic Settings For Panning Shots:
- You will need to actively be changing your shutter speed, your aperture, and your ISO = Manual Mode
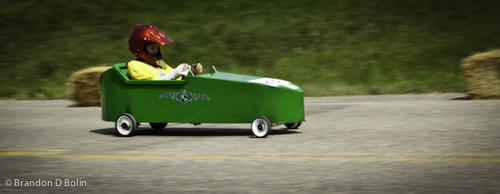
- The most important setting is your shutter speed, however the actual numbers vary depending on your subject. If you are shooting high speed action shots you can get great panning shots with 1/250 sec, however if you are shooting slow rolling soap box derby’s then you would need to drop the shutter speed down to around 1/60 sec. Obviously it is very difficult to get a good focused shot with such a slow shutter speed, but this is where the advances in digital photography help us. We can shoot tons and tons of pictures! Start taking pictures in large burst, and with any luck one or two will turn out.
- Now to find a good aperture, focus through your view finder and read your exposure compensation meter. (Looks sorta like this: (-)—|—(+) ) Change your aperture until your exposure compensation arrow returns back to the centre for a well exposed shot. It really depends on your shooting conditions and your subject’s speed to decide on an aperture. For example if it’s really bright out, and your subject is really slow, you need a long shutter speed thus a really small aperture (ex: f22). Take a few practise shots before any of the real action comes!
- The ISO should be kept low, but you can always increase it if your images are too dark.
- Lastly, put your camera on “tracking mode” or AIServo. For greater details on “tracking mode”, or “AIServo” on the Canon’s check out this website.

Basic Skills For Panning Shots:
- Find a location that is relatively clear of other people, so you have the room to be swinging your camera around.
- Find a location that has your subject moving perpendicular to yourself. (T)
- Take lots, and lots of shots. Any slight vertical movement in one single image may ruin it completely.
- Gently roll your finger over the trigger. Do not jump on it. This will only increase vertical movement.
- Take a deep breath and hold as still as possible. Then smoothly rotate as your subject passes by.
- Keep your focus point on the same spot on the subject while panning.
- Let your camera save all the images after your burst of shots, turning it off before hand increases the risk of loosing images.
- There is no need to continue shooting after the subject is past you… the rear end of anything is usually never any good. 🙂

Supplementary Panning Photography Points:
- Panning photography is much like HDR… it’s awesome but don’t have every shot as a panning shot. Have some still images, because sometimes the background you’ve been blurring out might just be really important!
- Panning photography is an art… like any other photography it takes practice.
- Find colourful backgrounds, they will look really cool in “blurry motion”.
- Try using a flash. The flash may help get your subject in focus… however you may run into more issues like lighting and then the background may also be in greater focus that previous.
- Try panning using the Dutch Angle technique! Or Vertically! Experiment!
- Try panning on different object such as bikers, skate boards, boats, planes, kids, animals, and the list goes on!

To Tripod, or Not To Tripod? Ok, What About A Monopod?
Usually we would be using a tripod at these shutter speeds, but personally a tripod only inhibits the smoothness of my panning shots. Perhaps if you are mounting your camera on a Gimble Mount, or a nice Ball Head… Really though it comes down to personal preference and how heavy your lens is. If you’re shooting with large lenses then you obviously do not want to be holding it up all day by hand! With that note, using a large lens on a ball head is difficult while panning because your camera may tend to “tip over” as you turn horizontally. This is where a smooth Gimble Mount comes in.
Maybe you’re like me… you simply can’t stop shaking when holding up your camera. Throwing it on a monopod will reduce the vertical shake, however I think a monopod still really inhibits the smoothness you can rotate and follow your subject.
Great Sources To Delve Deeper Into Panning Photography:
Car Photo Tutorials – Awesome article on car specific race panning photography.
DPS – General overview on panning shots.
All Things Photography – Quick and simple overview.
Comment